How To Use Silicone Basket In Air Fryer (2026 Guide)
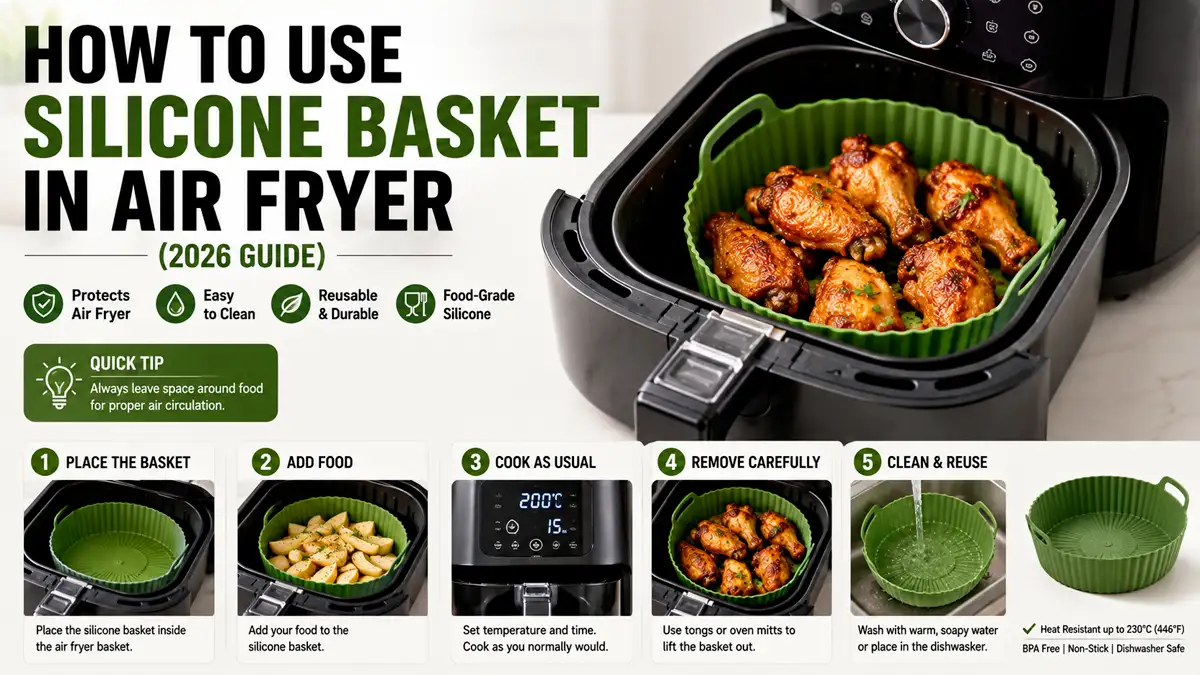
Air fryers cook by blasting hot air around food, but messy drips and sticky coatings can make clean-up annoying. A food-grade silicone basket (sometimes sold as a silicone liner or silicone pot) lets you cook over the air fryer basket while catching drippings. This guide tells you how to use a silicone basket in an air fryer safely and how to keep crisp results, not soggy ones.
A silicone basket in an air fryer works by trapping drippings while still letting air circulate, as long as the liner has vent holes and you don’t overcrowd. Preheat the air fryer, place the silicone basket inside, cook in a single layer, and shake once or twice. For chicken, use a thermometer and cook to 165°F (74°C).
Key Takeaways
- Choose food-grade silicone. Use a heat-resistant, food-safe silicone basket or liner that fits your air fryer drawer.
- Preheat for consistency. Heat the air fryer before cooking so the basket starts at temperature.
- Keep airflow open. Use a vented design; DIY mats need holes or you can reduce crisping.
- Don’t overcrowd. A single layer helps prevent steaming and uneven browning.
- Shake and flip. Move or turn food partway through to expose fresh surfaces to hot air.
- Check doneness. For chicken, reach 165°F (74°C), verified with a thermometer.
How to begin
A silicone basket in an air fryer is an insert you set inside the air fryer basket or drawer so food cooks without coating the main surface. It’s often marketed as a reusable, nonstick insert that catches drippings while you still get hot-air cooking.
Start by matching two things: basket size and airflow. Silicone baskets are sold in different sizes, and the main reason “it didn’t crisp” happens is either the basket doesn’t fit well or the silicone is thick or poorly vented, limiting air circulation.
Basics of how to use silicone basket i
Food-grade silicone baskets or liners are designed to sit in the air fryer and hold foods like chicken while catching drips. You normally use tongs to move and turn food, and a light oil or spray can help crispness when the food needs it.
DIY liners can work if you cut them to fit, but you need vent holes. Without airflow, the food can steam instead of crisp, which defeats why you bought an air fryer in the first place.
What the basket actually changes
A silicone basket shifts mess off your air fryer’s base, so sticky sauces and drippings don’t bake onto the main basket. You still rely on the air fryer’s hot air circulation, which is why venting and spacing matter more than most people expect.
What to prepare before cooking
Wash the silicone basket with warm, soapy water, rinse, and dry it fully before first use. Moisture trapped on the liner can cause uneven browning, and a completely dry surface makes the first round of cooking behave more consistently.
how to use silicone basket i
Use this workflow the next time you cook with a silicone basket, and you’ll avoid the two classic problems, sogginess and messy edges.
- Preheat the air fryer. Turn it on and preheat to your recipe temperature so the air fryer reaches heat before food hits the silicone.
- Place the silicone basket inside. Set the liner in the air fryer basket/drawer, making sure it sits flat and doesn’t block vents or fans.
- Prep the food for crisping. Pat proteins dry (especially chicken), season, and apply a light cooking spray or oil mister if you want better browning.
- Load in a single layer. Spread food so pieces aren’t piled on top of each other; overcrowding is a common reason for steaming.
- Cook and shake partway through. Run the timer, then use tongs to turn or shake the food so crisping happens on more surfaces.
If your recipe gives a rough time range, don’t treat it as gospel. Instead, start checking doneness early with visual cues and, for chicken, a thermometer.
Timing that works in real life
Most small-batch items cook faster in an air fryer because the hot air moves constantly, but silicone insert cooking can slightly change how quickly drippings evaporate. In practice, you still follow the recipe time range, then adjust by 1-3 minutes if surfaces aren’t browned enough.
Doneness cues you can trust
Use these cues to decide when to stop cooking:
- Chicken: thermometer to 165°F (74°C) in the thickest part.
- Crisp coatings: browned edges and a firm surface, not a wet sheen.
- Vegetables: tender insides with some surface color, not pale and watery.
Things that matter most
The biggest technique is airflow management. Choose a vented silicone basket, load a single layer, and shake or flip mid-cook to refresh contact with hot air.
The second technique is temperature consistency. If you skip preheating, the silicone basket starts colder and drippings can cling longer before they evaporate, which is when texture gets soft.
Avoid “works great until it doesn’t” behavior
These are the situations where silicone baskets can underperform:
- Bad venting (DIY without holes). You may trap moisture and reduce crisping.
- Overfilling to the top. Food steams rather than fries because hot air can’t move around it.
- Thick liners. Some are too thick or poorly vented, which keeps surfaces damp.
How to get crispness anyway
You can still crisp with silicone as long as you help the process:
- Pat proteins dry before seasoning.
- Use an oil mister for a thin, even coat.
- Shake once or twice so every side sees airflow.
What works in practice
Plan for safe handling and easy cleanup. Silicone baskets are easy to lift with an oven mitt because they get hot like any cooking surface, and you should treat them as hot-touch items.
For cleaning, follow the manufacturer’s instructions first. Some silicone baskets are dishwasher-safe, but if yours is not, warm soapy water and thorough drying is the safer route.
A practical “do this every time”
- Preheat the air fryer.
- Use vented, food-grade silicone that fits your model.
- Load one layer only.
- Shake or flip during cooking.
- Check doneness with a thermometer when food safety matters.
Cooking spray vs. oil
Cooking spray works well because it delivers light coverage. If you drizzle oil heavily, it can pool in silicone pockets and slow browning, so aim for a mist or thin coat.
Mistakes to Avoid with how to use silicone basket i
Overcrowding is the most common mistake. When food is piled, hot air can’t circulate, and you get steaming, uneven cooking, and coatings that don’t dry and crisp.
The second most common mistake is blocking airflow with the liner itself. If your silicone basket is too thick, poorly vented, or a DIY liner without enough holes, you can reduce crisping even if the food tastes fine.
Specific “don’t do this”
- Don’t use a non-vented DIY liner. Cut holes if you’re making a custom insert.
- Don’t fill the basket to the top. Leave space for hot air to circulate.
- Don’t skip drying. Wet silicone can cause uneven browning.
- Don’t assume time equals doneness. Chicken especially needs a thermometer.
Pro Tips for how to use silicone basket i
If you’re cooking chicken or anything with drips, pat the surface dry first and use a light oil mister. This improves browning because the surface has less free moisture before it hits hot air.
For sauces, the trick is restraint. Thick sauces can burn if they drip straight onto the air fryer base, and silicone helps catch drippings, but heavy glaze still needs time and airflow, so apply a lighter coating and consider adding extra sauce after the first cook stage.
Use these upgrades for better results
- Thermometer for proteins. Cook chicken to 165°F (74°C), not just “looks done.”
- Shake schedule: halfway through is usually a good first attempt, then adjust for your favorite foods.
- Turn sticky items carefully. Use tongs gently so breading or batter stays intact.
Substitutions when you don’t have a silicone basket
If you don’t have one, you can still protect the air fryer with these options:
- Air fryer parchment liners designed for high heat (only if they don’t block airflow).
- Foil cradles or small trays for specific items like wings, as long as you keep ventilation clear.
- Cook directly and adjust cleaning by using a brush and warm water for small residue.
(Each alternative changes airflow slightly, so expect time and crisping differences compared to a vented silicone basket.)
What works in practice
Silicone baskets are easiest to use when you treat them like a cooking insert, not like a “set-and-forget bowl.” The insert should be checked for a secure fit before cooking.
Also, check fit before you cook. If the basket doesn’t sit correctly or interferes with how your air fryer closes, you’ll lose airflow and may get uneven browning.
Storage and maintenance
Let the silicone basket cool completely before cleaning. Store it dry so odors don’t build up, and avoid stacking heavy items on top of it if it’s thin, since creases can hold residue.
Troubleshooting quick fixes
- Food is pale or soft: spread thinner next time, shake earlier, and confirm your silicone basket is vented.
- Chicken is undercooked: cook longer and rely on 165°F (74°C) as the endpoint.
- Too much mess at the edges: reduce sauce volume and load in a single layer so drips don’t overflow.
Mistakes to Avoid with how to use silicone basket i
If you only remember one thing, remember this: the silicone basket must still allow air to move around food. When people choose a liner that blocks airflow or pack the basket tight, the air fryer stops behaving like an air fryer.
The second big miss is assuming “nonstick” means “no prep.” Patting dry and using a thin oil mist are still important, especially for chicken, breaded items, and anything with skin.
A quick self-audit after your first attempt
Ask yourself:
- Did I preheat?
- Did I use a vented silicone basket?
- Was food crowded?
- Did I shake or flip mid-cook?
- Did I verify doneness (especially for chicken) with a thermometer?
Fix one variable at a time, and you’ll dial in results fast.
Pro Tips for how to use silicone basket i
If you want the most consistent crisping, run a short “test batch” with one item you cook often, then tweak only one parameter. Compare the result with your usual method to identify which adjustment helps most.
You can also improve the lift-out experience by letting the basket cool just enough to handle safely with oven mitts. Silicone is flexible, so gentle handling prevents deforming the basket in a way that can affect fit.
A simple first meal plan
For your first silicone-basket test, choose chicken pieces because the doneness cue is clear and the payoff is big. Prep them dry, mist lightly with oil, and cook until the thickest piece reaches 165°F (74°C).
Then try the same method on vegetables next. If vegetables still come out soft, it almost always points to airflow issues (crowding or venting), not seasoning.
FAQ
How to begin
Use a food-grade silicone basket that fits your air fryer drawer, then load food and follow your recipe. The insert should sit flat without interfering with the drawer or vents.
Basics of how to use silicone basket i?
Silicone basket liners sit inside the air fryer and catch drippings while hot air cooks the food. Airflow is the key variable, so choose vented silicone and avoid blocking vents.
how to use silicone basket i?
Prep food by patting proteins dry and misting lightly with oil if needed. Cook according to the recipe, then use tongs to turn food when appropriate. Finish by checking chicken at 165°F (74°C) with a thermometer.
Things that matter most
Prioritize airflow and keep food spaced out. Shake or flip mid-cook so moisture releases and crisp surfaces form on more than one side.
What works in practice
Handle the basket with oven mitts because it heats up, and cool it before cleaning. Follow the manufacturer’s care instructions for washing.
Mistakes to Avoid with how to use silicone basket i?
Don’t fill the basket to the top, and don’t use a thick or poorly vented liner. Also, don’t rely on time alone for chicken; use a thermometer to 165°F (74°C).
Pro Tips for how to use silicone basket i?
For better crisping, pat chicken dry and mist with oil lightly before cooking. If sauces are involved, use a lighter coating at first and add more later, since heavy drips can interfere with crisp surfaces.
Can I use a silicone basket in any air fryer?
Most silicone baskets work with air fryers that have a removable basket/drawer, but fit matters. Measure your air fryer basket opening and choose a silicone insert that sits flat without touching or blocking vents and fan areas. If it doesn’t sit correctly, you’ll likely reduce airflow and crisping.
What’s the best way to clean a silicone basket after cooking?
Cool the basket fully, then wash with warm, soapy water and dry completely. Many silicone baskets are dishwasher-safe, but you should follow the basket’s instructions if they differ. If food residue is stuck, soak briefly, then scrub gently before the next use.
Can silicone baskets go in the dishwasher?
Some silicone baskets are dishwasher-safe, but not all. Check the manufacturer’s care instructions that came with your basket, then follow them. If you don’t have instructions, wash by hand with warm soapy water and dry fully to avoid damaging the liner.
How long does it take to cook in a silicone basket?
Start with your recipe time range, then adjust based on browning and doneness cues. Silicone liners can change how quickly drips evaporate, so you may need small adjustments of 1-3 minutes. For chicken, the real “done” signal is 165°F (74°C) measured in the thickest part.
Is using a silicone basket safer than cooking directly?
Using a properly designed, food-grade silicone basket is generally safe for air fryer cooking when it’s heat-resistant and used at the temperatures your air fryer reaches. Still, avoid cheap unknown silicone, keep it off direct heating elements where your model exposes them, and always handle it with oven mitts because it gets hot.
What should I do if my food comes out soggy?
Sogginess usually comes from poor airflow. Spread food out more, confirm your silicone basket is vented, and check that the liner is not blocking vents. If using oily sauces, reduce how much drips at first.
What are good alternatives to a silicone basket?
If you don’t have one, use air fryer-compatible parchment designed for high heat, or small foil trays that still leave airflow space. You can also cook directly with careful cleaning, especially for foods that don’t drip heavily. Expect slightly different crisping compared to a vented silicone basket and adjust time accordingly.
Final Take
A silicone basket is one of the easiest upgrades for your air fryer. It creates a non-stick surface that keeps food from sticking and makes cleanup quick and simple . Before first use, wash it with warm, soapy water to remove any manufacturing residue .
Key tips for best results:
Size matters: Measure your air fryer basket before buying — the silicone liner should fit flat with about 1–2 inches of clearance around the edges for proper air circulation.
Don’t preheat with it: Never place the silicone basket inside during preheat mode. The heating element can cause smoke . Place it in the air fryer only when you’re ready to cook.
Load food properly: Add food directly onto the silicone surface. Leave space between pieces and don’t pile food higher than 1½ inches to avoid trapping steam.
Use food every time: Always use the silicone basket with food inside — never run it empty.
Handle with care: The basket gets hot during cooking. Use oven mitts or tongs when removing it, and let it cool before cleaning.
Most silicone baskets are dishwasher-safe, but hand washing with warm, soapy water can extend their life. If you’re after maximum crispiness, keep in mind that metal baskets generally produce crispier results; you may need to slightly increase cooking time or temperature with silicone.