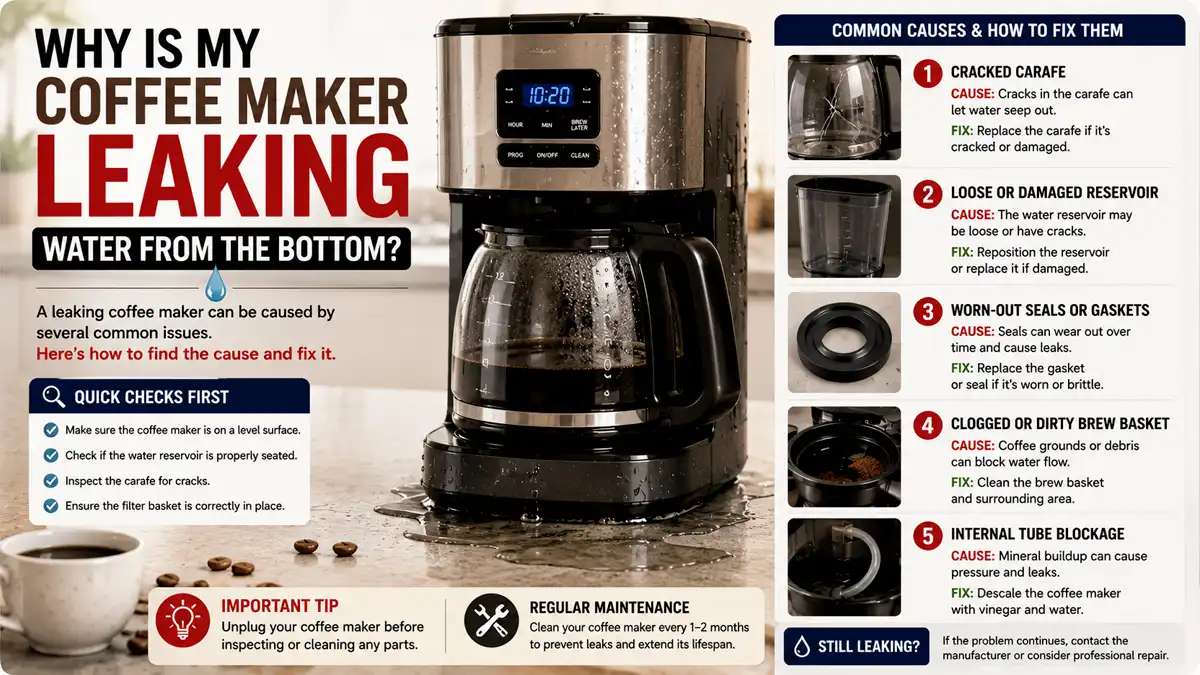
Why Is My Coffee Maker Leaking Water From The Bottom
Why is my coffee maker leaking water from the bottom is a common question, and the answer usually comes down to a failed gasket, a loose tank seal, or an overflow caused by a clog. Water may also escape from the brew path, heater area, or carafe-and-plate assembly. The fix depends on where the water first appears: toward the front, center, or back of the base.
Unplug the machine, dry it completely, and watch where moisture returns first. Dripping during brewing points to a brew-path seal, clogged valve, overflow line, or mis-seated carafe. Water that appears while the machine is idle usually points to the tank seal, overfilling, or condensation collecting beneath the unit.
Key Takeaways
- Most common cause: A worn gasket or misaligned seal near the heater or brew path lets water seep out.
- Clogs matter: Mineral buildup can cause overflow and make water leak from the base during brewing.
- Check the tank seal: A damaged gasket or improperly seated tank can leak even when the machine is not brewing.
- Check carafe placement: A loose or mis-seated carafe can misdirect water and cause dripping around the base.
- Stop using the machine: Keep it unplugged until the area is dry if water is reaching electrical components.
- Repair or replace when needed: If the leak returns after cleaning and reassembly, a replacement part or service call is safer.
Why a Coffee Maker Leaks From the Bottom
Water from the bottom can reach the heater housing and internal wiring, so unplug the coffee maker and let it dry fully before troubleshooting. If water has pooled inside the base cavity, not just on the counter, do not keep brewing to see whether the problem disappears.
Most leaks start in one of three areas:
- Water tank area: A gasket, float, inlet tube, or tank connection may be leaking.
- Brew path: A valve, hose, or gasket around the heater may be allowing water to escape.
- Overflow or condensation area: A clog, excessive flow, or excess water may send liquid down into the base.
How to Find the Coffee Maker Leak Source
Dry the base completely, then run a plain-water brew cycle with no coffee grounds. Watch for the first wet spot rather than the place where water eventually pools on the counter.
The timing can reveal the likely fault. If the first drip appears 30-90 seconds after brewing starts, suspect a seal, valve, or misrouted brew path. A slow seep often comes from a gasket that lets water through under pressure. A sudden stream usually indicates an overflow, blocked outlet, or incorrectly installed part.
Location helps too:
- Toward the back: The internal water routing, heater area, or overflow lines may be involved.
- Toward the front: The tank seating, inlet connection, or carafe-and-plate area may be responsible.
- Directly under the tank: Check the tank gasket, valve, and the way the tank locks into the base.
Steps to Stop a Coffee Maker From Leaking
Start with checks that require no tools. Unplug the coffee maker, remove the carafe, filter basket, and tank, and dry the base thoroughly with paper towels. Run a plain-water brew cycle and watch for the earliest wet spot.
Then perform a reassembly reset. Reseat the tank firmly, make sure the carafe sits correctly on the warming plate, and confirm that the filter basket is fully seated. A seal can look intact but still leak once the machine vibrates during brewing.
Descale the machine if water flow has changed
Mineral buildup is a strong suspect if the machine has been used with hard water, brews more slowly, or has developed inconsistent flow. Run a descaling cycle using the method recommended for your model, or use a vinegar solution if the manual allows it. Afterward, run 2-3 plain-water cycles to flush the machine.
If the leak improves but does not stop completely, scale may still be affecting the water flow. Descaling can address the cause of an overflow, but it will not repair a cracked or permanently deformed gasket.
Inspect the accessible parts
Look for cracks in the carafe, warped plastic parts, loose hoses, or deteriorated gaskets around the heater area. If your model has a removable brew seal or rubber gasket, check that it sits flat and is not twisted.
If water is collecting near the electrical compartment, or dripping continues immediately after you unplug and dry the machine, stop troubleshooting. Service or replacement is safer than opening the base without knowing which parts carry electrical current.
A practical troubleshooting sequence
- Unplug and dry: Completely dry the base and the accessible underside.
- Confirm timing: Run a plain-water brew and note when moisture starts.
- Check tank seating: Reseat the water tank until it clicks or locks properly.
- Verify carafe alignment: Re-seat the carafe and ensure the drip stop aligns.
- Descale if needed: Run a full descaling cycle, then flush with plain water.
- Inspect seals and parts: Look for cracked tubing, worn gaskets, or twisted seals.
What Fixing the Leak Prevents
A repaired leak keeps water from escaping the brew path or overflow route, which can improve brewing consistency and prevent weak or bitter coffee. It also stops water from soaking the countertop or collecting beneath the machine.
Recurring leaks can damage internal components, especially heater housings and connectors. Catching a small seal or overflow problem early gives you a better chance of avoiding a larger repair.
Descaling may restore proper flow when mineral buildup is causing the overflow. It can improve brewing consistency and reduce the chance of future leaks. If the gasket is worn, replacing it can restore the machine’s intended water routing and pressure.
Repair or Replace a Leaking Coffee Maker?
Cleaning is the right first step when the leak began after hard-water buildup, slower brewing, or inconsistent flow. A part-level repair makes sense when you can identify a failed gasket, cracked tube, or seal that clearly is not seating.
Replacement is more practical when the leak returns after cleaning and reassembly or involves parts that are not user-serviceable. Many coffee makers are cost-sensitive in the US, so replacing the unit may cost less than paying for complex internal repairs.
| What you notice | Most likely cause | Best option | When to stop DIY |
|---|---|---|---|
| Drips start during brewing | Brew-path gasket or overflow line | Unplug, re-seat parts, descale, then re-test | If water keeps appearing near electrical areas |
| Leak starts after you fill or reinsert tank | Tank gasket, inlet tube, tank not seated | Reseat tank, check gasket condition | If tank seal looks degraded and no replacement is available |
| Leak is only condensation-like after use | Condensation from normal operation | Wipe dry, check vents, run a dry cycle | If it turns into active dripping during brewing |
| Leak happens with filter basket installed | Mis-seated basket or overflow from clog | Descale, confirm basket seating | If overflow continues after 1 full flush cycle |
| Leak returns after descaling | Worn gasket, cracked component | Replace serviceable seals or parts, or repair | If you cannot identify the leak point confidently |
Use the correct gasket for your exact model. A generic seal may fit poorly and create a worse leak.
Safety Rules for a Leaking Coffee Maker
Water reaching the base may result from pressure inside the brew path or from an overflow route, so do not leave the machine running until the leak stops. Unplug it immediately if dripping continues during brewing. Continued exposure can worsen a seal failure and increase the chance of water contacting electrical components.
Treat mineral scale as a likely cause when brewing has slowed or takes longer than usual. Scale can narrow the flow path, raise internal pressure, and force water through the weakest seal. Even when the leak seems unrelated, descaling may resolve an overflow problem.
Reassemble every part fully and straight. Carafes and tanks are common trouble spots because their latch points can appear engaged while leaving a small gap. That gap may become a steady leak once the machine starts vibrating.
If an accessible rubber brew seal is flattened, cracked, or warped, cleaning will not restore its shape. Replace the seal or have the machine serviced.
Common Coffee Maker Bottom-Leak Patterns
Dampness that appears immediately after filling and snapping the tank into place points to the tank gasket or an inlet connection that is not sealing. Reseat the tank and check the rubber gasket for wear.
A machine that leaks only after running for a while may have condensation or delayed water from an overflow line. The deciding factor is whether active dripping occurs during brewing. If it does, treat the problem as a real leak rather than normal condensation.
If the coffee maker began brewing more slowly and leaking from the bottom after switching to harder water, mineral buildup is a likely contributor. Descaling can restore flow, reduce internal pressure, and stop overflow from reaching the base.
FAQ
What’s the most common reason a coffee maker leaks from the bottom?
A worn or mis-seated seal around the brew path or heater area is the most common cause. Tank-seating problems are also common when the leak appears immediately after refilling.
Can I fix a coffee maker leaking from the bottom myself?
Yes, if the leak is limited and the cause is accessible. Reseating the tank and carafe or replacing the correct model-specific gasket may solve the problem. If the gasket is cracked or twisted, arranging service is safer than repeated cleaning.
How long will it take to find the leak source?
Expect 20-45 minutes for a first-pass diagnosis. A descaling cycle can take longer, so observe an active leak before starting deep cleaning.
Is it safe to keep using a leaking coffee maker?
No, not if water is dripping during brewing or pooling near internal electrical areas. Unplug the machine and stop using it until the base is dry and you have confirmed that the leak is gone. If the leak returns immediately after reassembly, service or replacement is the safer choice.
What’s a common mistake people make when troubleshooting leaks?
Many people reassemble the machine without drying the base first, then mistake old water for a new leak. Another common mistake is descaling while ignoring a mis-seated carafe or cracked gasket. Dry the machine before changing multiple parts at once.
Final Take
A coffee maker leaking from the bottom is rarely a death sentence. Most of the time, it’s a quick fix that takes under ten minutes. Start with the simple checks: make sure the water tank is seated correctly, the filter basket isn’t overflowing, and the carafe is properly in place. If the leak persists, inspect the rubber seal on the water reservoir for cracks or debris, and give your machine a thorough descaling to flush out mineral buildup that can cause internal pressure leaks.
If those steps don’t solve it, look deeper. A cracked water reservoir, a loose internal hose, or a worn-out seal could be the culprit. These are also fixable with a replacement part and a little patience. For most common models, replacement seals and parts are affordable and widely available.
If you’ve tried everything and the machine is still leaking — or if you’re uncomfortable opening up the unit — it’s worth calling the manufacturer’s customer service or a qualified repair technician. A small leak addressed quickly is a minor inconvenience; one left to linger can lead to water damage or mold over time.
Most leaks are easy to fix. Start with the simple stuff. If that doesn’t work, don’t give up. A replacement part or a quick service call is still cheaper than a new coffee maker.