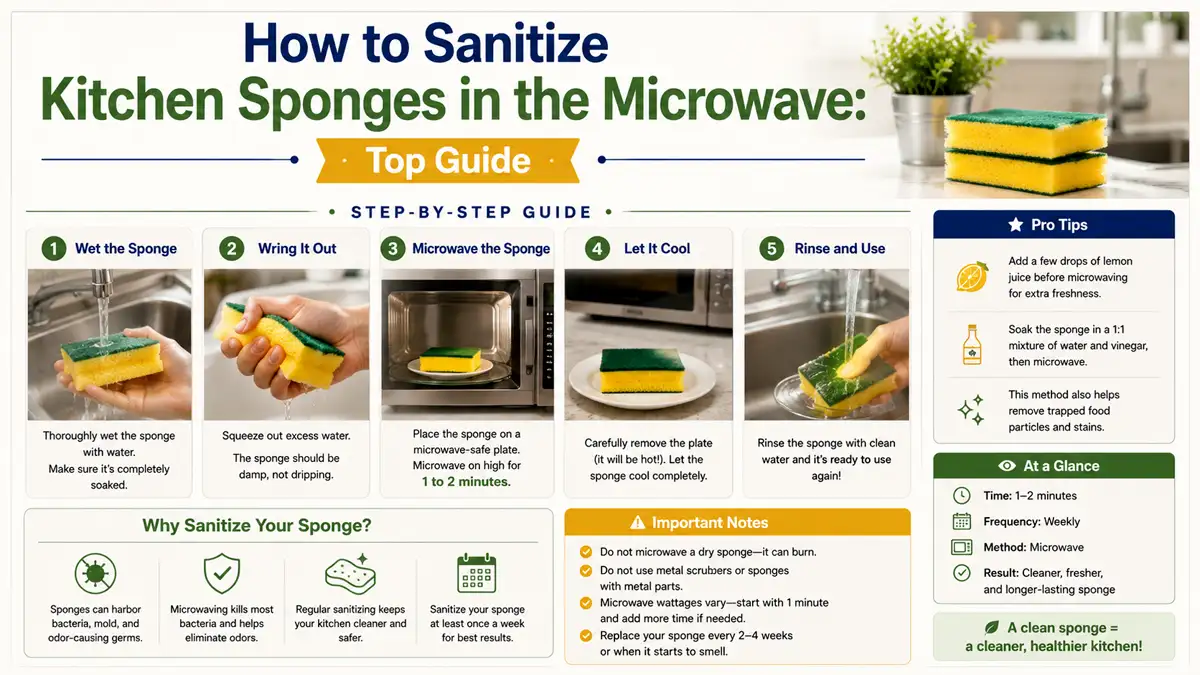
How to Sanitize Kitchen Sponges in the Microwave: Top Guide
Microwave sanitizing can reduce bacteria on a damp kitchen sponge, but only when the sponge is fully wet and heated long enough. A dry, charred, or scorched-smelling sponge is a burn hazard. Most sponges should also be replaced every 2-4 weeks, even if you sanitize them regularly.
Microwave a fully wet sponge for 1-2 minutes total on high power, starting with 1 minute. Place it upright in a microwave-safe container, check it carefully, and add 30-60 seconds only if needed. Never microwave a dry sponge, and discard any sponge that falls apart, melts, smokes, or smells burnt.
Key Takeaways
- Keep it upright. Place it in a microwave-safe bowl so steam can heat the sponge evenly.
- Watch for damage. Stop if the sponge steams aggressively, smells burnt, or starts smoking.
- Avoid cross-contamination. Wash your hands after handling the hot sponge, and keep it away from clean counters.
Can You Sanitize a Kitchen Sponge in the Microwave?
Yes. Moisture allows steam and heat to move through the sponge. A dry sponge can overheat quickly, scorch, and create a fire hazard.
Check the sponge before you begin. Standard cellulose, polyurethane foam, and typical scrub sponges can usually go in the microwave when they are wet and contain no metal. If the sponge has a metal scrubber, hard plastic pieces, or decorative foil, use another method. Metal can arc, while plastic can melt or deform.
How Microwave Sanitizing Works
Sanitizing reduces bacteria on a surface through heat or chemicals. Disinfecting is a stronger process intended to kill viruses as well. Microwave sanitizing can reduce bacteria on a sponge’s surface and within its pores, but it does not make the sponge sterile.
The temperature the sponge reaches determines how effective the process is. A wet sponge produces steam and heats more evenly. A dry sponge behaves more like a small fuel source and can scorch. Use a microwave-safe container, wear microwave-safe gloves if you have them, and watch the first cycle closely so you learn how your microwave handles the sponge.
Step-by-Step Microwave Sponge Sanitizing
- Wet the sponge thoroughly. Soak it in hot water until it is fully saturated, then squeeze it lightly so it is not dripping.
- Remove anything unsafe for the microwave. Take off metal scrub attachments and plastic parts that are not clearly microwave-safe.
- Place the sponge in a microwave-safe bowl. Set it upright in a ceramic or glass bowl that can handle heat.
- Add water for steam. Pour about 1-2 tablespoons of water into the bowl, not onto the microwave turntable, to help create steam.
- Microwave on high in short bursts. Heat the sponge, then check it carefully with oven mitts before continuing.
- Let it cool before handling. Wait 1-2 minutes, then squeeze it over the sink. Use it only after it is cool enough to touch safely.
For a typical dish sponge, check it after the first cycle. If it smells scorched or looks melted, stop and discard it.
Techniques for More Even Heating
Position the sponge for steam. Porous material heats more evenly when steam can circulate through it. Keep the sponge upright or place it where steam can move around it instead of pressing it flat against the bottom of the bowl.
Use short bursts because microwave wattage and sponge moisture vary. You need enough heat for sanitation, but excessive heating can scorch the sponge. With a new microwave or a new type of sponge, monitor the first cycle closely.
Use a dedicated bowl for the sponge. Hot water and residue can splatter inside the container. After the cycle, wash the bowl with hot soapy water and dry it before using it again.
Treat odor and physical damage as safety warnings. A sponge that is falling apart, has a persistent sour smell, or shows browning has reached the end of its useful life. Microwaving cannot restore deteriorating material.
How to Keep a Sanitized Sponge Hygienic
Replace sponges when they deteriorate or retain lingering odors. Microwave sanitizing can reduce bacteria, but it cannot remove organic buildup trapped in the pores indefinitely.
Clean the sponge before sanitizing it. Wash it with hot water and dish soap first, then microwave it. Cleaning removes dirt and organic matter, making the heat step more effective.
Reduce recontamination after each cycle. Let the sponge cool and dry slightly between uses, and store it where water can drain, such as on a rack. A sponge that stays continuously wet provides better conditions for bacterial growth than one that dries between meals.
A sponge is not your only option. Rotate between a sponge and a brush, and launder washable scrub pads according to their care instructions. If you see visible mold, replacement is usually the faster and safer choice.
Microwave Sponge Mistakes to Avoid
The biggest mistake is microwaving a dry sponge. Dry sponges can overheat, scorch, smoke, and create a fire risk, especially at high power.
Do not microwave without checking the sponge between cycles. Microwave ovens differ, and excessive heating can be too aggressive for some combinations of wattage and sponge moisture.
Never put metal scrubbers in the microwave. Metal can spark, and hard plastic can deform. Skip microwave sanitizing entirely if the sponge has a metal-infused side or foil-backed scrub layer.
Do not use the sponge immediately after heating. It retains heat and can burn your fingers or hands. Squeezing it while it is hot can also release scalding water and steam.
Replace a sponge that is peeling, crumbling, or permanently discolored. Microwaving will not repair material fatigue or make a deteriorating sponge safe to keep using.
Ways to Make the Routine More Consistent
Start with the same condition each time. Soak the sponge for the same amount of time, then squeeze it to a similar dampness level. Consistency makes it easier to judge whether the sponge is heating normally.
Keep a separate sponge bowl in the kitchen. A small, dedicated microwave-safe dish makes splatters easier to clean, reduces cross-contamination, and reminds you to wash the container as well.
Track when you replace the sponge. Write the date near the sink or add it to your notes app. Once a sponge nears the end of its useful life, sanitizing should serve as a short-term measure rather than a permanent solution.
If you frequently cook seafood or raw poultry, sanitize the sponge more often and consider using a disposable paper towel for the initial wipe-down. That limits how much raw organic matter the sponge absorbs before cleaning and sanitizing.
FAQ
What is the safest time to microwave a kitchen sponge?
Start with 1 minute on high with the sponge fully wet, then add 30-60 seconds only if it does not look fully heated. If you see smoke, smell burning, or notice melting, stop immediately and discard the sponge.
Do I need to wet the sponge before microwaving?
Yes. The sponge should be fully saturated before microwaving. A dry sponge can scorch quickly and create a burn or smoke risk.
Will microwaving sanitize a sponge that smells bad?
Microwaving may reduce bacteria, but it will not reliably fix a sponge with a persistent sour odor or visible breakdown. If the smell returns quickly after sanitizing, replace the sponge.
How often should I sanitize kitchen sponges in the microwave?
A practical routine is after heavy use, such as after preparing raw meat, and otherwise at least 2-3 times per week. Replace sponges every 2-4 weeks for best hygiene.
What is a good alternative if my sponge has metal or a scrub pad?
If the sponge contains metal or other non-microwave-safe materials, wash it with hot soapy water and replace it more frequently, or use a different cleaning tool. Follow the care instructions for washable scrub pads and launder them when possible.
Final Take
Microwaving a wet sponge is one of the most effective ways to kill harmful bacteria. According to the USDA, it can eliminate 99.99999% of bacteria, making it more effective than dishwashing or chemical soaks . However, you must follow a few essential safety rules: ensure the sponge contains no metal and is completely saturated with water to prevent a fire hazard . Even with regular sanitizing, sponges are not meant to last forever, so replace them every one to two weeks or when they develop a persistent odor or lose their shape