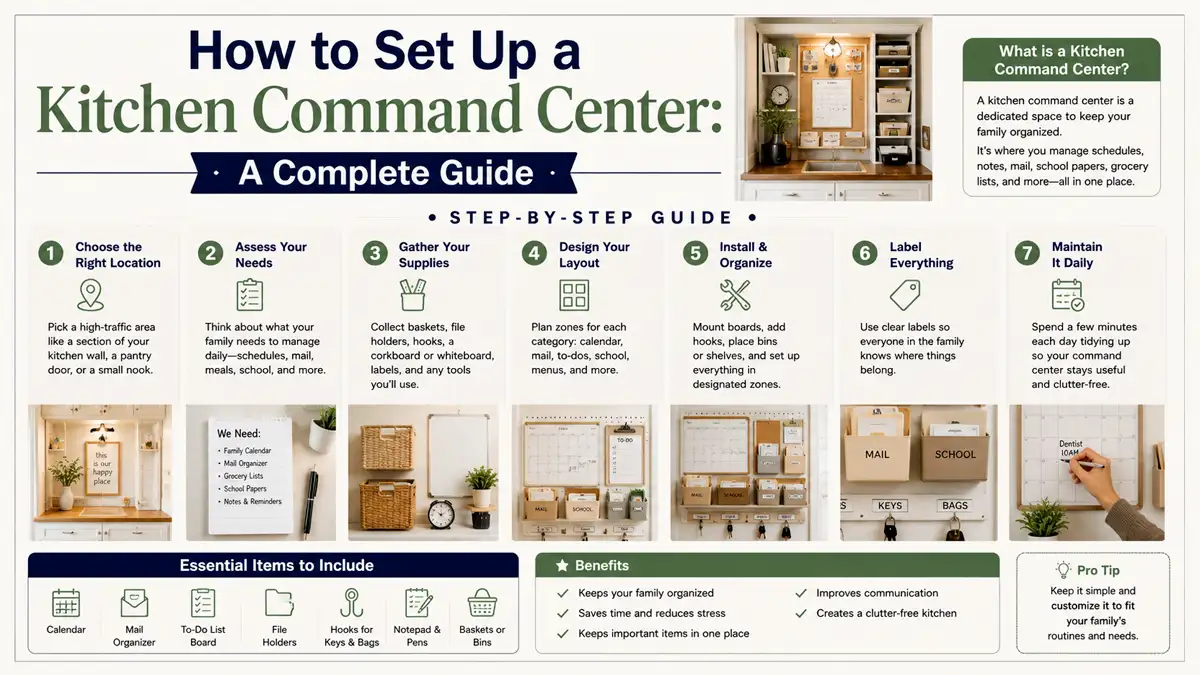
How to Set Up a Kitchen Command Center: A Complete Guide
A kitchen command center cuts down on “where did we put that?” moments by putting recipes, schedules, and groceries in one place. The key constraints are simple: plan power and reliable Wi-Fi where people naturally look, usually near the fridge or prep area, plus a system simple enough to survive past week one.
Kitchen command centers usually take one of two forms: paper and clipboard, or a smart display paired with shared apps. Both can work. Choose the format that matches how your household already communicates, then place it where people can see it while cooking and before leaving the house. Shared grocery and schedule lists should live in one place and get a weekly review that takes ideally under 10 minutes.
Key Takeaways
- Pick your setup. Choose paper-first or smart-first, then commit for at least 2 weeks.
- Plan the power path. Run power and hide cables before mounting anything permanently.
- Use shared lists. Grocery and calendar updates must live in one shared place.
- Assign zones. Keep kid tasks, guest notes, and cooking reminders separate to avoid clutter.
- Create a weekly ritual. Do one 10-minute review every week on the same day and at the same time.
- Troubleshoot early. If Wi-Fi is weak or glare is bad, adjust placement before adding more screens.
How To Set Up A Kitchen Command Center That Works
Start with the outcome you want: faster decisions while cooking and fewer missed tasks. For most households, that means one source of truth for groceries and schedules, plus a visible spot for day-to-day instructions such as “tonight’s dinner” and “who’s bringing what.” A command center fails when it is too complicated or too hidden.
A practical setup has a central viewing area with a large display or board, one shared grocery list, and a simple rotating weekly plan. If you choose a smart display, use it to push updates while keeping the layout readable from 3 to 6 feet away. If you choose paper, make it the authoritative record and add apps only after the basic routine feels stable.
What You Need Before You Start
Take 20 minutes to answer these questions before buying anything:
- Who will use it: just you, kids too, or guests as well?
- What do you need to track: groceries, meals, appointments, chores, reminders, or all of these?
- How often will updates happen: daily during cooking, weekly planning, or whenever something changes?
- Do you have Wi-Fi coverage near the command center?
- Is there an outlet nearby, or will you need an electrician to add one?
What Should the Command Center Include?
Include information that gets acted on, not information that merely gets stored. The most useful command centers have four buckets: meals, groceries, schedules, and kitchen instructions. Everything else is optional.
A strong baseline includes:
- Today/Tonight plan: dinner title, start time, and any “must prep by” notes
- Grocery list: a single shared list that everyone can add to
- Calendar at-a-glance: the next 7 days of appointments, pickups, and deadlines
- Recipe access: the 5 to 10 recipes you actually make, not your entire recipe history
- Household notes: batteries to replace, mail to check, and visitor details
- Kitchen instructions: quick references for allergen reminders, substitutions, or “first step” cards
For a smart setup, add a meal widget and a shared grocery list app. For a paper setup, use printed weekly meal cards and a grocery tear-off pad or clipboard sheet.
Keep Recipes at the Right Depth
Recipes can overwhelm a command center when they include too much detail. Do not try to build a cookbook. Keep a “current rotation” shelf, whether that means laminated cards or a digital folder on the smart display. When you try a new recipe, replace one in the rotation next week.
Make the Information Readable From Across the Room
If people have to walk over to read the command center, they will stop checking it. Use:
- large text for titles and key times
- color coding for meal types, or a simpler “Weeknight” and “Weekend” system
- one consistent location for the grocery list
Where Should You Mount It in Your Kitchen?
Mount the command center where it is visible and reachable without forcing people into awkward positions. The fridge is a natural choice because everyone already visits it, but it may not be the best spot for cooking. If you plan to use the system while prepping food, place it near the counter work area.
Choose a primary view for checking information and a secondary access point for updates. The primary view might be a display near the fridge. The secondary access point could be a cork panel or small basket for cards, coupons, and note slips.
Account for these placement constraints:
- Glare: avoid direct sunlight and reflections from windows
- Height: place the center of the screen or board around eye level for most standing adults
- Traffic: keep it out of the main path so it does not become a bump point
- Distance to Wi-Fi: test the signal strength before committing to a smart-display location
Layouts for Small and Open Kitchens
In a small kitchen, place the command center at the end of the fridge wall. Put the grocery list on the side panel for easy access and the schedule on the front for visibility.
In an open-concept kitchen, use the largest blank wall where people can glance over from the dining and living spaces. If you have kids, place the kid zone lower only if it will not invite constant ripping, grabbing, and sticky-note sprawl. A clipboard at kid height can work better than mounting a screen low on the wall.
How Do You Wire and Power a Smart Command Display?
You do not need to hardwire every display. Most households can use a standard power adapter and hide the cord neatly. The important decisions are where the cable runs and how to prevent accidental unplugging.
Start by checking the outlet location and measuring how far the display power cable needs to reach. If there is no outlet within reach, consider:
- using a nearby outlet with a cable cover and strain relief
- adding an outlet if you can arrange the work safely
- moving the display to an outlet-friendly location instead of stretching the cord
Build a Safe, Practical Power Plan
Do a dry run before mounting:
- Plug in the display temporarily and confirm that it stays stable and readable.
- Walk around the room and check glare from different angles.
- Make sure the power cable will not be pulled when people open the fridge.
Then finish the installation:
- route the cable along a seam or the back edge of the cabinetry
- use adhesive cable clips or cord raceways to prevent sagging
- leave a little service slack so you can remove the display without ripping tape off the wall
Avoid detailed electrical rewiring unless you understand the work and local code requirements. If you need new power, hire an electrician and show them the planned mount location.
Fix Wi-Fi Problems Before Permanent Installation
A smart display is useful only if it updates reliably. If the Wi-Fi is weak near the chosen wall, move the display to a stronger signal area or add a mesh node instead of hoping the connection improves.
Before mounting permanently:
- check that the display connects from the intended location
- confirm that it loads shared lists without constant refreshing
- test notifications, especially if you rely on them for meal and grocery reminders
A display that repeatedly drops off the network will eventually be ignored.
How Do You Organize Recipes, Schedules, and Grocery Lists?
Organize the command center around three instant answers: “What are we eating?” “What is next on the calendar?” and “What do we need at the store?” Everything else should support those questions.
Use Three Clear Areas
Set up three separate areas for paper or three separate components for a smart display:
- Meals: one card or screen area showing tonight’s dinner and the next 3 to 7 meal options
- Calendar: a compact view of the next week, with times and addresses when relevant
- Groceries: one shared list, with categories if your family finds them useful
Categories can reduce friction. Try Produce, Dairy, Meat, Pantry, and Household. If your household does not sort items while shopping, leave the list uncategorized and rely on a consistent routine.
Follow a Weekly Refresh
A reliable weekly rhythm keeps the command center useful:
- pick a weekly day, such as Sunday morning
- enter meals for the next week
- confirm calendar entries that affect meal timing, including late nights and early pickups
- scan what is already in the kitchen so you do not double-buy
This routine does most of the work. If you update the system only during emergencies, you will feel behind all the time.
Make Recipe Access Fast
Reduce the number of steps required to open a recipe:
- Smart display: keep a curated set of favorites in one place instead of scattering them across multiple apps.
- Paper: print the week’s rotation and replace it during the weekly refresh.
Create short versions for common meals. A full recipe with a long backstory may belong in a binder, but it slows you down at the stove.
How Do You Manage Zones for Kids, Guests, and Cooking?
Separate zones keep the command center from turning into one crowded pile. Create three areas:
- Cooking zone: meal and prep instructions in a high-contrast, easy-to-scan format
- Family zone: groceries, schedules, and reminders for everyone
- Kids or guests zone: tasks or notes that change more frequently
Ownership keeps these zones useful. If kids add tasks, give them a designated area. If guests need information, give them a guest-facing space that does not mix with the family schedule.
Keep the Kid Zone Manageable
Make the kid zone tactile:
- a small clipboard or “today” card area at kid height
- 3 to 5 tasks maximum
- checkboxes that take seconds to complete
Use language that matches how your kids think. “Feed the pet” works better than “Perform animal care.” If tasks change often, keep the board small and update only the current day.
Keep Guest Notes Separate
Use a “leave these here” area for:
- parking instructions
- where to find towels
- Wi-Fi access, if you choose to share it
- meal expectations for the visit
Keep personal appointment notes out of the guest view. You can maintain a shared schedule in one place while keeping visible guest notes separate.
How Do You Keep the Command Center Updated Weekly?
Choose a day when you already handle administrative tasks, then follow a fixed checklist:
- confirm meals for the next week, or at least tonight’s meal and 3 backup dinners
- review calendar changes that affect meal timing
- scan the pantry and fridge for visible gaps without opening everything
- edit the grocery list based on what is actually missing
- replace or rotate recipe cards
- remove outdated notes so the board stays clean
Keep Updates Small and Consistent
Do not reorganize the entire system every time someone adds a grocery item. Add the item and maintain the list during the weekly refresh.
Decide who handles final curation. If everyone edits everything all the time, the system becomes noisy. One person can curate the weekly plan while everyone else adds grocery items and relevant notes.
FAQ
How Much Does It Cost to Set Up a Kitchen Command Center?
Costs vary depending on whether you use paper or a smart display. A paper setup can be as cheap as a board, a marker holder, and printed meal cards. A smart setup adds the cost of a display device and possibly a Wi-Fi boost if the signal is weak. Exact pricing depends on what you choose, and current prices are not available here.
How Long Does It Take to Set Up the System the First Time?
A paper command center can be set up in under an hour if you already have a location and basic materials. A smart setup usually takes longer because you need to plan the power route and confirm Wi-Fi reliability before mounting. Allow time for initial configuration, which usually means 1 to 2 short sessions across a day.
Is a Smart Kitchen Command Display Safe to Mount Near the Stove?
Prioritize heat, moisture exposure, and cable safety. Keep the display away from direct steam and splatter zones, and route power cables where they cannot be tugged. If you are unsure about the placement relative to the stove and backsplash, use the fridge wall or another surface with less exposure.
What Is the Most Common Command Center Mistake?
The most common mistake is adding too many components and too much information, so nobody checks the system consistently.
Can I Start With Paper and Upgrade to Smart Later?
Yes. Start with paper meal cards, a visible weekly schedule, and one grocery list that everyone can update. Once those habits work, add a smart display for visibility and shared notifications, then migrate recipes and calendar views gradually. Keep the same layout concept so the upgrade does not reset everyone’s behavior.
Final Take
A kitchen command center is only as good as the habits that support it. Start simple—paper works just as well as a smart display—and commit to using it for at least two weeks. Place it where people naturally look, keep updates to a weekly 10-minute review, and assign clear zones for meals, schedules, and groceries. The goal isn’t perfection; it’s reducing daily “where did we put that?” moments. When the system starts working, the whole kitchen runs smoother.