How to Create a Coffee Station in a Small Kitchen (2026)
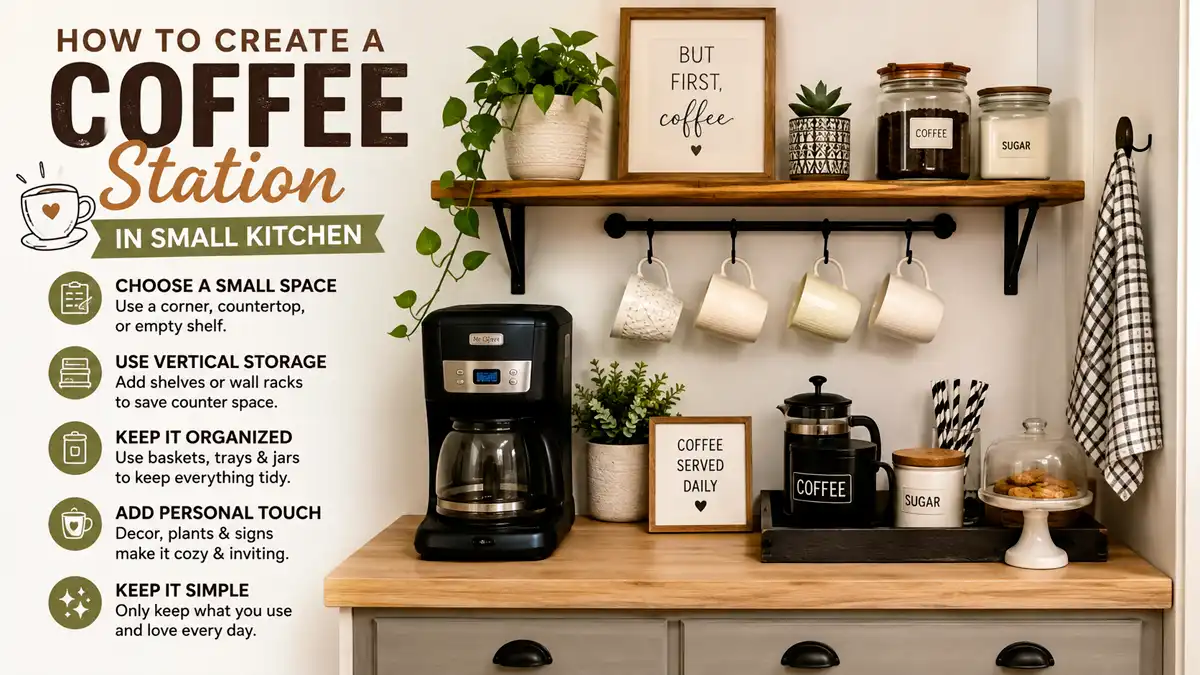
To create a coffee station in a small kitchen, choose a corner near an outlet, use a tray or cart to define the space, and keep brewing essentials within a 2–3 step “no backtracking” zone. A setup of about 18–24 inches wide can accommodate a compact brewer, supplies, and a small waste bin for a morning routine that stays organized.
A small-kitchen coffee station should make brewing faster, not create another clutter zone. Keep your grinder or brewer, filters, and mugs within a 2–3 step “no backtracking” zone, and your mornings get easier while mess stays contained. With one brewing method, a short workflow, and sensible storage, a counter area of about 18–24 inches wide can handle a compact machine, supplies, and a waste bin.
Plan the station around a simple sequence: beans or pods, brewer, mug, then waste. Keep daily tools in pull-out or lidded containers so you can reset the area in under 60 seconds.
Key Takeaways
- Start with your workflow. Keep beans, brewer, and mugs within two steps to avoid daily clutter.
- Pick one brewing method. Choose drip, pod, or espresso, then design around it to save space.
- Control water and power. Use a machine with a tank if you cannot plumb, and place it near an outlet.
- Use vertical storage. Install a small shelf or hooks so measuring spoons and filters stay off the counter.
- Plan storage for waste. Add an easy-to-empty bin for grounds and a covered container for backups.
Build the Station Around Your Morning Workflow
Build it once, then make it easy to use daily
A coffee station should support a repeatable routine, not become a one-time decorating project. On a typical morning, beans should be ready, the brewer should be reachable, and your mug should move from cabinet to cup without a search for tools. In a small kitchen, that usually means one counter zone and one storage area, not five scattered spots.
Match the station to your habits. If you want convenience and drink one cup at a time, a pod setup with a dedicated drawer for accessories is hard to beat. If you care more about flavor and do not mind preparation, a compact drip machine or pour-over station makes better use of your space. The goal is to remove friction, because clutter collects wherever the workflow feels annoying.
Use this 1-day setup flow
Keep the project contained by following the same sequence:
- Clear a “landing strip” on the counter where the brewer will live.
- Put all coffee-related items into a staging bin, or two bins, so you can see what you already own.
- Move only daily-use items into the station zone.
- Store backup supplies nearby but out of sight.
- Test the routine, then remove anything that blocks brewing, refilling, or cleaning.
1-day build checklist
- Pick your brewer style: pod, drip, or pour-over.
- Measure the counter zone width and the space under cabinets.
- Choose where the water goes: a tank refill spot or a nearby sink.
- Install one storage upgrade: a bin, shelf, or hooks.
- Load daily items while leaving room to clean and wipe.
A practical small-kitchen layout
With a 24-inch section of counter next to a single outlet, place the brewer in the center. Store mugs to the left in a narrow cabinet bin, and put filters and stir tools to the right in a lidded container. Set the grounds or waste bin directly under or beside the station so used filters do not travel across the kitchen.
A shared kitchen needs a station that can “stop clean.” Use lidded containers, a small tray for drips, and a clear spot for the mug stack. Those details keep the area tidy when mornings are rushed.
Place the Coffee Station Near Power, Water, and the Next
Put it near the outlet and the next action
The best location lets you move in a straight line: coffee maker on one side, cup on the other, and waste and refills below or immediately adjacent. Power comes first. If the brewer needs a plug, choose a zone with a single nearby outlet rather than relying on an extension cord across a walkway.
Water is the next constraint. If the brewer has a tank, place it near a sink or another convenient refill point without making you carry a full reservoir across the kitchen. A machine connected to a water line is less common in a small kitchen, and its location must align with the plumbing. For most people, a tank refill is the simpler option.
Use the 3-zone rule to prevent counter chaos
Give each part of the station one job:
- Brew zone – the machine and grinder, if you use one.
- Prep zone – filters, spoons, and measured coffee.
- Reset zone – wipes, spare filters, and waste containers.
A small kitchen rarely has room for a fourth zone devoted to temporary staging. If waste and backup supplies keep piling up on the counter, the station needs better storage rather than more accessories.
Use vertical space when the counter is tight
Move small items upward when the counter is narrow. A wall shelf above the station can hold filters and frequently used cups. Hooks under a cabinet can hold measuring spoons and a scoop. Keep these items away from the counter edge, where they are more likely to fall, disappear behind appliances, or become part of a permanent clutter pile.
Choose Coffee Equipment and Supplies That Fit
Buy fewer items in the right sizes
A small counter fills quickly, so choose equipment that reduces steps. The essentials are a brewer, coffee storage, filters or pods, a scoop or spoon, a way to manage grounds or used pods, and a tray or wipe cloth for drips. Everything else is optional.
Match containers to your coffee volume. If you buy coffee in bags, use a sealed canister so it stays fresh and does not spill. If you use pods, put extras in a drawer or wall-mounted rack that keeps them from being crushed. If you use grounds, portion them into smaller containers so you do not have to open a large bag every morning.
Use stackable storage that hides the clutter
Lidded bins work well for filters and backups. Clear bins make supplies easy to find but can look busy, so labels may be a better choice in an open station. Under-cabinet baskets and stackable organizers use vertical space without taking over the counter.
Small-space supply list
- Coffee storage – an airtight canister or sealed bag container.
- Filters or pods – enough for 1-2 weeks, not months.
- Measuring tool – a scoop or scale, depending on your routine.
- Mug storage – one small stack, not an entire mug collection.
- Waste management – a small bin for grounds or a pod container.
- Cleaning supplies – paper towels or a small roll, plus a dedicated brush.
Keep the small tools from becoming big clutter
Small accessories determine whether the station stays clean. An espresso setup needs a small knock box, while a pod setup benefits from a simple covered trash bin. For drip or pour-over, keep paper towels and a small rinse container or wipe cloth nearby to handle water rings and drips before they spread.
Choose a Brewing Setup That Matches Your Space and Time
Choose pod or full-brew based on your routine
For a small kitchen, a single-brew setup is the better starting point when you want quick mornings and minimal cleanup. Pods provide consistent portions and require little counter preparation. A full-brew setup, such as drip or pour-over, gives you more control but adds filters, grounds, cleanup, and storage needs.
If you usually drink one type of coffee, single-serve brewing removes the daily decision about what to make. If you enjoy experimenting or prepare larger batches for guests, a drip machine or pour-over workflow earns the extra space.
Compare the setups
| Setup type | Key spec/format (typical) | Best for small kitchens when… | Main trade-off |
|---|---|---|---|
| Pod single-serve | Capsule system | You want quick brewing and low cleanup | You depend on pod storage and ongoing cost |
| Countertop drip | Carafe or basket + filter | You want basic full-brew volume | Filters, carafe cleaning, and grounds cleanup take space |
| Pour-over station | Server + dripper + paper filters | You like manual control and minimal machinery | More step-by-step prep and extra items to store |
Pick one setup and design around it
If counter space is tight and you want the station to stay organized, choose one of the three brewing methods and give its supplies a fixed home. For most small kitchens, a pod brewer paired with a shallow drawer for pods and tools creates the easiest “set it and forget it” arrangement.
A compact drip machine or a separate grinder can work just as well if you already own one or prefer freshly ground coffee. Give that setup a tighter waste plan and a dedicated reset zone so grounds and filters do not spread across the kitchen.
Organize Coffee, Filters, and Accessories by Frequency
Keep daily items at counter height and backups out of sight
Store anything you use every day at eye level or counter height. Put filters, backup coffee, spare cups, and other occasional supplies in an adjacent cabinet or drawer.
Give every item a landing spot
Coffee or beans belong in one sealed container. Filters should sit in one bin that you can grab with one hand. Spoons, a scoop, and a brush can share a small organizer tray instead of drifting across the counter.
A tray plus one lidded filter bin is enough for many stations. Upgrade only when a specific problem appears; better placement usually matters more than more storage products.
Match storage to the brewing method
Pod stations need storage that keeps capsules from being crushed and a waste container that is easy to empty. Drip and pour-over stations need a clean place for filters and grounds, along with a way to control splashes and odors. Storage should make cleanup faster, not simply hold more supplies.
Example organization for a pod station
- Left side: mug stack in a bin-lip shelf.
- Center: pod brewer on a tray.
- Right side: pods in a shallow drawer bin.
- Under station: covered waste container with a lid.
Example organization for a drip station
- Left side: carafe and filter drawer.
- Center: brewer with a drip tray or wipe cloth station.
- Right side: scoop, sugar or creamer container, and stir tools.
- Under station: small trash can or grounds bin.
Arrange the Equipment Around One Compact Footprint
Plan for one appliance footprint, not several
Choose the brewer’s permanent location first, then build storage around it. If you add a grinder, place it where it will not block the machine’s water tank, controls, or cup area. A layout that requires you to move the grinder before every brew or cleaning session will not stay organized.
When space is especially limited, look for equipment that combines roles. A unit with an internal grinder or a compact brewer can reduce the number of appliances competing for counter and storage space.
Use a lateral-flow layout
A lateral-flow layout keeps your movement in one direction. Place the machine where you can use it without turning around, then position cups, waste, and refills so you can finish the brew in one pass.
Three layouts work well in narrow kitchens:
Layout A: brewer-only counter
- Machine sits centered on the counter zone.
- Filters and accessories are stored in a nearby drawer.
- Waste bin sits under the counter or directly beside the machine.
Layout B: brewer plus mug storage
- Mug storage sits to one side at cabinet height.
- Brewing happens at the center of the counter.
- Cleanup tools live in a small tray near the front edge.
Layout C: shelf-assisted layout
- Brewer sits on the counter.
- Filters and cups sit on a wall shelf above.
- Waste bin sits on a pull-out shelf under the counter.
Leave room for refills and cleaning
Measure more than the appliance footprint. Account for the lid opening, water-tank access, filter insertion, pod removal, and the hand movement needed to wipe around the machine. A station can technically fit beneath a cabinet and still be too cramped to use comfortably.
Limited clearance is a common reason people abandon a coffee station. If you cannot refill or clean without shifting another item, change the layout before adding storage.
Manage Water, Power, and Storage Without Creating New Problems
Use a tank refill plan when plumbing is unavailable
A water-tank brewer lets you place the station wherever safe power and convenient water access meet. If you refill the tank near the machine, use a small mat or tray to catch accidental drips before they become a counter problem.
For a machine that needs frequent refills, keep backup water containers nearby. That prevents mid-morning shortages and keeps the reservoir from being left beside the sink or brewer.
Use one outlet and keep cords controlled
Do not run extension cords across kitchen traffic. Moving the station closer to the outlet is usually better than stretching a cable across a walkway. If you use a power strip, keep it on the counter behind the station so cords do not hang where someone can snag them.
Leave room for heat and steam, too. Do not wedge the brewer into a narrow gap where heat can build up around its sides. Cabinets should not block the machine’s ventilation or make it difficult to remove the water tank.
Store supplies by frequency, not category
Seasonal or rarely used extras should live elsewhere in the kitchen.
Storage efficiency checklist
- Put daily coffee tools closest to the brewer.
- Keep filters or pods in one labeled container.
- Use a covered waste bin to contain odors and mess.
- Store spare mugs in another cabinet, not at the station.
- Keep a wipe cloth or paper towels in a fixed spot.
Create a reset routine that takes only a few minutes
After brewing, handle the waste, wipe up drips, and return tools to their tray or bin. A reset that takes under a few minutes keeps the station usable and prevents small messes from becoming a weekend project.
FAQ
How much counter space do I need for a small coffee station?
A practical target is about 18-24 inches of counter width for the brewer and a small accessory tray. A pod brewer may need less because filters are not part of the setup and pods can fit in a compact drawer or bin. If you add a separate grinder, allow extra clearance for water access and controls.
What supplies should I buy first?
Start with the brewer you already own or plan to buy, coffee storage such as an airtight container or sealed bag container, filters or pods, and one waste solution such as a covered bin or pod container. Add a measuring tool and a dedicated wipe or paper towel spot before buying extras. The station should work on day one.
Is a coffee station safe near a sink or water?
It can be safe when the electrical parts stay dry and the outlet is properly installed. Keep the brewer on a dry tray or mat if you refill it nearby, and avoid splashing water toward the machine. If condensation collects around power areas, move the station or change the refill setup.
How do I set up a coffee station without cluttering a tight cabinet?
Use one pull-out drawer or one lidded bin for filters and accessories. Store mugs in a small stack with a tray liner or bin to keep them from sliding. Put backups behind the daily supplies, and label the front bin so items return to the same spot each time.
What is the most common coffee-station mistake in a small kitchen?
The most common mistake is leaving too many coffee tools on the counter because they seem convenient. As counter items multiply, the quick reset disappears and clutter spreads into the rest of the kitchen.